
1. Introduction:
This article primarily introduces the practical application of LIMO Cobot by Elephant Robotics in a simulated scenario. You may have seen previous posts about LIMO Cobot’s technical cases, A[LINK], B[LINK]. The reason for writing another related article is that the original testing environment, while demonstrating basic functionality, often appears overly idealized and simplified when simulating real-world applications. Therefore, we aim to use it in a more operationally consistent environment and share some of the issues that arose at that time.
2. Comparing the Old and New Scenarios:
First, let’s look at what the old and new scenarios are like.
Old Scenario: A simple setup with a few obstacles, relatively regular objects, and a field enclosed by barriers, approximately 1.5m*2m in size.

New Scenario: The new scenario contains a wider variety of obstacles of different shapes, including a hollowed-out object in the middle, simulating a real environment with road guidance markers, parking spaces, and more. The size of the field is 3m*3m.
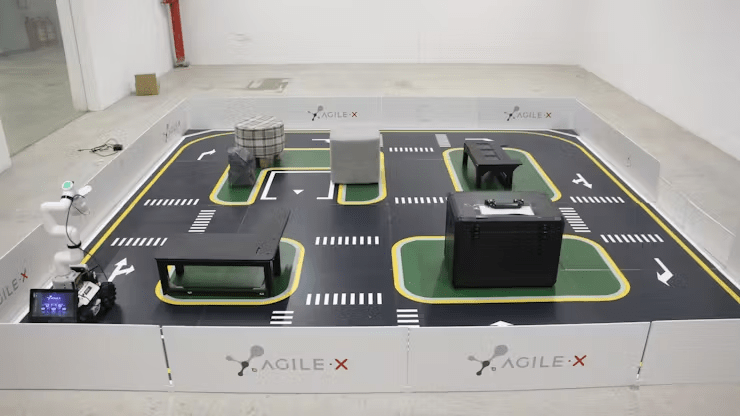
The change in environment is significant for testing and demonstrating the comprehensiveness and applicability of our product.
3. Analysis of Practical Cases:
Next, let’s briefly introduce the overall process.
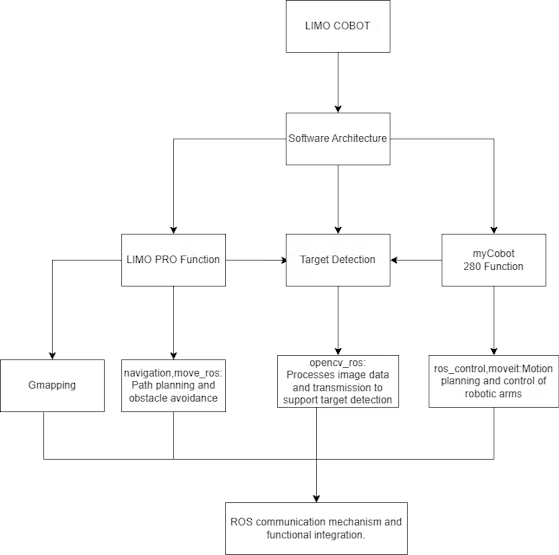
The process is mainly divided into three modules: one is the functionality of LIMO PRO, the second is machine vision processing, and the third is the functionality of the robotic arm. (For a more detailed introduction, please see the previous article [link].)
LIMO PRO is mainly responsible for SLAM mapping, using the gmapping algorithm to map the terrain, navigate, and ultimately achieve the function of fixed-point patrol.
myCobot 280 M5 is primarily responsible for the task of grasping objects. A camera and a suction pump actuator are installed at the end of the robotic arm. The camera captures the real scene, and the image is processed by the OpenCV algorithm to find the coordinates of the target object and perform the grasping operation.
Overall process:
1. LIMO performs mapping.⇛
2. Run the fixed-point cruising program.⇛
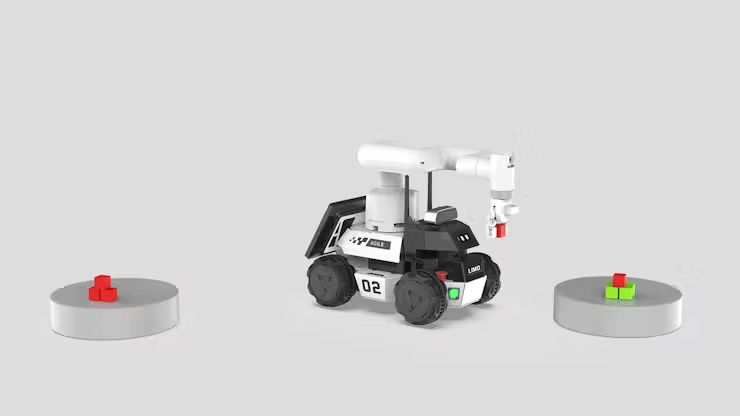
3. LIMO goes to point A ⇛ myCobot 280 performs the grasping operation ⇒ goes to point B ⇛ myCobot 280 performs the placing operation.
4. ↺ Repeat step 3 until there are no target objects, then terminate the program.
Next, let’s follow the practical execution process.
Mapping:
First, you need to start the radar by opening a new terminal and entering the following command:
roslaunch limo_bringup limo_start.launch pub_odom_tf:=falseThen, start the gmapping mapping algorithm by opening another new terminal and entering the command:
roslaunch limo_bringup limo_gmapping.launchAfter successful startup, the rviz visualization tool will open, and you will see the interface as shown in the figure.

At this point, you can switch the controller to remote control mode to control the LIMO for mapping.
After constructing the map, you need to run the following commands to save the map to a specified directory:
1. Switch to the directory where you want to save the map. Here, save the map to `~/agilex_ws/src/limo_ros/limo_bringup/maps/`. Enter the command in the terminal:
cd ~/agilex_ws/src/limo_ros/limo_bringup/maps/2. After switching to `/agilex_ws/limo_bringup/maps`, continue to enter the command in the terminal:
rosrun map_server map_saver -f map1
This process went very smoothly. Let’s continue by testing the navigation function from point A to point B.
Navigation:
1. First, start the radar by entering the following command in the terminal:
roslaunch limo_bringup limo_start.launch pub_odom_tf:=false2. Start the navigation function by entering the following command in the terminal:
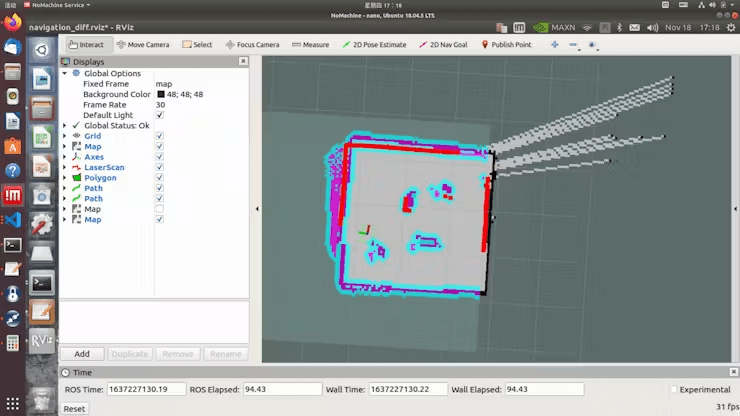
roslaunch limo_bringup limo_navigation_diff.launchUpon success, this interface will open, displaying the map we just created.
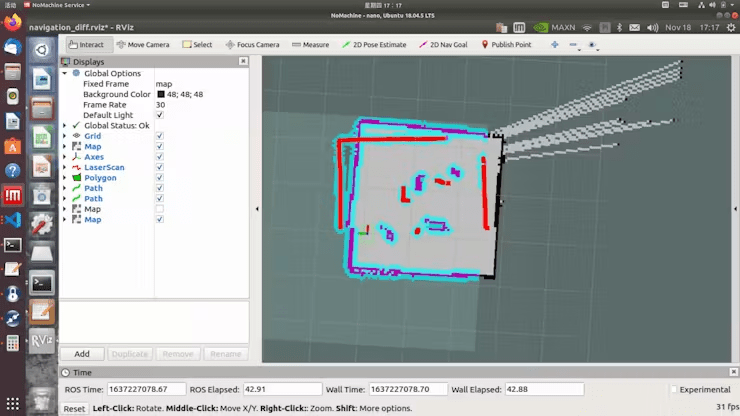
Click on „2D Pose Estimate, “ then click on the location where LIMO is on the map. After starting navigation, you will find that the shape scanned by the laser does not overlap with the map. You need to manually correct this by adjusting the actual position of the chassis in the scene on the map displayed in rviz. Use the tools in rviz to publish an approximate position for LIMO. Then, use the controller to rotate LIMO, allowing it to auto-correct. When the shape of the laser scan overlaps with the shapes in the map’s scene, the correction is complete, as shown in the figure where the scanned shape and the map overlap.
Click on „2D Nav Goal“ and select the destination on the map for navigation.
The navigation test also proceeds smoothly.
Next, we will move on to the part about the static robotic arm’s grasping function.
Identifying and Acquiring the Pose of Aruco Codes
To precisely identify objects and obtain the position of the target object, we processed Aruco codes. Before starting, ensure the specific parameters of the camera are set.
Initialize the camera parameters based on the camera being used.
def __init__(self, mtx: np.ndarray, dist: np.ndarray, marker_size: int):
        self.mtx = mtx
        self.dist = dist
        self.marker_size = marker_size
        self.aruco_dict = cv2.aruco.Dictionary_get(cv2.aruco.DICT_6X6_250)
        self.parameters = cv2.aruco.DetectorParameters_create()
Then, identify the object and estimate its pose to obtain the 3D position of the object and output the position information.
def estimatePoseSingleMarkers(self, corners):
        """
        This will estimate the rvec and tvec for each of the marker corners detected by:
           corners, ids, rejectedImgPoints = detector.detectMarkers(image)
        corners - is an array of detected corners for each detected marker in the image
        marker_size - is the size of the detected markers
        mtx - is the camera matrix
        distortion - is the camera distortion matrix
        RETURN list of rvecs, tvecs, and trash (so that it corresponds to the old estimatePoseSingleMarkers())
        """
        marker_points = np.array([[-self.marker_size / 2, self.marker_size / 2, 0],
                                  [self.marker_size / 2, self.marker_size / 2, 0],
                                  [self.marker_size / 2, -self.marker_size / 2, 0],
                                  [-self.marker_size / 2, -self.marker_size / 2, 0]], dtype=np.float32)
        rvecs = []
        tvecs = []
        for corner in corners:
            retval, rvec, tvec = cv2.solvePnP(marker_points, corner, self.mtx, self.dist, False,
                                              cv2.SOLVEPNP_IPPE_SQUARE)
            if retval:
                rvecs.append(rvec)
                tvecs.append(tvec)

        rvecs = np.array(rvecs)
        tvecs = np.array(tvecs)
        (rvecs - tvecs).any()
        return rvecs, tvecs
The steps above complete the identification and acquisition of the object’s information, and finally, the object’s coordinates are returned to the robotic arm to execute the grasping.
Robotic Arm Movement and Grasping Operation
Based on the position of the Aruco marker, calculate the target coordinates the robotic arm needs to move to and convert the position into a coordinate system suitable for the robotic arm.
def homo_transform_matrix(x, y, z, rx, ry, rz, order="ZYX"):
    rot_mat = rotation_matrix(rx, ry, rz, order=order)
    trans_vec = np.array([[x, y, z, 1]]).T
    mat = np.vstack([rot_mat, np.zeros((1, 3))])
    mat = np.hstack([mat, trans_vec])
    return mat
If the Z-axis position is detected as too high, it will be corrected:
if end_effector_z_height is not None:
        p_base[2] = end_effector_z_height
After the coordinate correction is completed, the robotic arm will move to the target position.
# Concatenate x, y, z, and the current posture into a new array
            new_coords = np.concatenate([p_base, curr_rotation[3:]])
            xy_coords = new_coords.copy()
Then, control the end effector’s API to suction the object.
The above completes the respective functions of the two robots. Next, they will be integrated into the ROS environment.
#Initialize the coordinates of point A and B
    goal_1 = [(2.060220241546631,-2.2297520637512207,0.009794792000444471,0.9999520298742676)] #B
    goal_2 = [(1.1215190887451172,-0.002757132053375244,-0.7129997613218174,0.7011642748707548)] #A
    #Start navigation and link the robotic arm
    map_navigation = MapNavigation()
    arm = VisualGrasping("10.42.0.203",9000)
    print("connect successful")

    arm.perform_visual_grasp(1,-89)
    # Navigate to location A and perform the task
        for goal in goal_1:
        x_goal, y_goal, orientation_z, orientation_w = goal
        flag_feed_goalReached = map_navigation.moveToGoal(x_goal, y_goal, orientation_z, orientation_w)
        if flag_feed_goalReached:
            time.sleep(1)
            # executing 1 grab and setting the end effector's Z-axis height to -93.
            arm.unload()
            print("command completed")
        else:
            print("failed")
4. Problems Encountered
Mapping Situation:
When we initially tried mapping without enclosing the field, frequent errors occurred during navigation and localization, and it failed to meet our requirements for a simulated scenario.
Navigation Situation:
In the new scenario, one of the obstacles has a hollow structure.
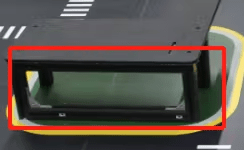
During navigation from point A to point B, LIMO may fail to detect this obstacle and assume it can pass through, damaging the original obstacle. This issue arises because LIMO’s radar is positioned low, scanning only the empty space. Possible solutions include adjusting the radar’s scanning range, which requires extensive testing for fine-tuning, or adjusting the radar’s height to ensure the obstacle is recognized as impassable.
Robotic Arm Grasping Situation:
In the video, it’s evident that our target object is placed on a flat surface. The grasping did not consider obstacle avoidance for the object. In the future, when setting special positions for grasping, this situation needs to be considered.
5. Conclusion
Overall, LIMO Cobot performed excellently in this scenario, successfully meeting the requirements. The entire simulated scenario covered multiple core areas of robotics, including motion control of the robotic arm, path planning, machine vision recognition and grasping, and radar mapping navigation and fixed-point cruising functions of the mobile chassis. By integrating these functional modules in ROS, we built an efficient automated process, showcasing LIMO Cobot’s broad adaptability and advanced capabilities in complex environments.
Credits